Wednesday, March 28, 2018

Pinterest Food find: Super Lemon Bundt Cake

1 comment:
Our family LOVES lemons-honestly it's sort of silly how much we love them!  My mom gave me a few lemons straight off the tree and I decided to make a bundt cake-I turned to Pinterest and found this DELICIOUSNESS:
Picture and recipe from: Sprinkles Some Sugar
Ingredients:
Lemon Cake
2 1/4 cups all-purpose flour
2 1/4 tsp baking powder
1/2 tsp salt
4 eggs
2 cups sugar
1 tsp vanilla extract
2 tbs lemon zest
2 tbs + 2 tsp lemon juice
1 1/4 cups whole milk
10 tablespoons unsalted butter, cubed
Lemon Glaze
1 1/2 cups powdered sugar
3-5 tbs lemon juice
Lemon Sugar Topping
1 tbs lemon zest
1 tbs granulated sugar

Instructions:
Preheat oven to 350 degrees Grease a bundt pan very well making sure to really get into all crevices then lightly flour pan. Set aside.
Lightly whisk flour, baking powder and salt in a small bowl and set aside. In the bowl of your stand mixer (if you're using one) fitted with the paddle attachment, beat eggs on low until they are thickened and very pale yellow in color. Turn mixer on low and slowly add sugar to running mixer and beat on medium-high speed until light and fluffy. Stir in vanilla, lemon juice and lemon zest. Slowly pour in dry ingredients on low speed until combined.
In a small saucepan, heat milk until very hot and butter is just melted. Do not boil and whisk the mixture to help the butter along. Pour into batter and mix until smooth. Batter will be very thin. Pour into prepared baking pan and bake for 27-35 minutes or until a toothpick inserted into the center comes out with a few moist crumbs. Once done, remove cake from oven and allow to cool for 5 minutes in pan. Release the sides of the cake with a butter knife to ensure it isn’t going to stick. Turn cake onto a large round platter or cake stand. (If using a 9x13 pan, do not remove cake, just place entire pan onto wire rack so underneath the pan can cool also.) Allow cake to finish cooling until warm to the touch.
While cake is cooling, prepare lemon sugar and glaze. For the lemon sugar, thoroughly mix the lemon zest and sugar together and let it sit for 5 minutes. If you don’t want the lemon zest on top of the cake, push the sugar through a fine mesh strainer, separating the two and discard the zest. If you don’t mind the zest on top of your cake (it will give it a nice pop of color!), then just set the mixture aside.
For the glaze, whisk powdered sugar and lemon juice, using more or less lemon juice as needed to get desired consistency. (I like to keep mine slightly thick so it won’t thin out too much when I serve it over warm cake.)Once cake is cooled down slightly, drizzle glaze over warm cake. Alternately, you can drizzle the glaze over each individual piece being served. Sprinkle lemon sugar on top.
Cake will stay soft and moist for 3 days stored in an airtight container.

Monday, March 26, 2018

awesome.

1 comment:
For this layout I wanted to keep it simple-love the clean lines and GORGEOUS paper by Jillibean Soup!
 closeup of the title:
Thanks for stopping in for a visit-hope your day is FANTASTIC!!

Saturday, March 24, 2018

family

1 comment:
 This fun picture was taken on Mother's day 2016-fun to have some of the cousins together-and take a picture with their grandma!  Here are some closeups of the details of the page:
 the bohemian pattern is right up Grandma's alley-totally reminds me of her! ;) . Thanks for the visit today!


Wednesday, March 21, 2018

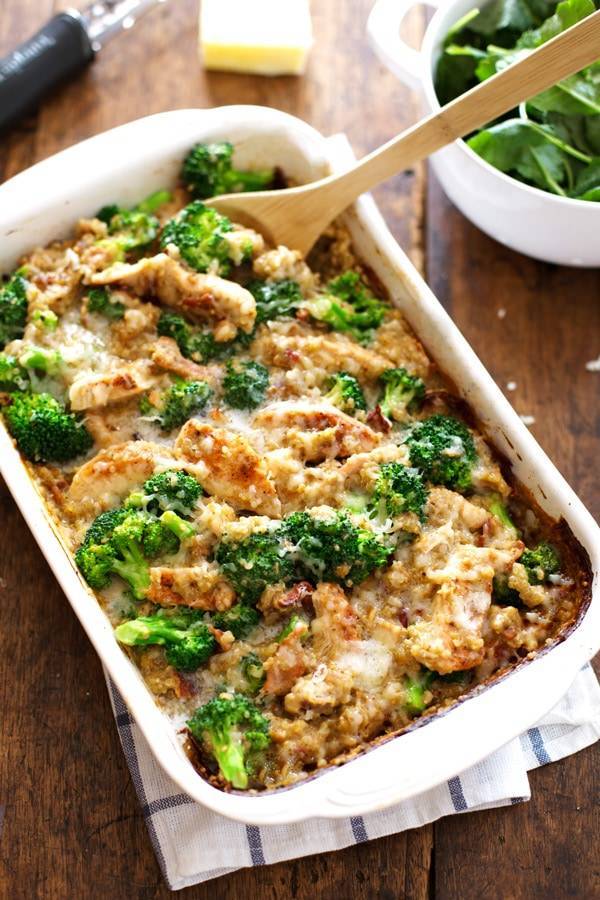
Pinterest Food Find-Creamy Chicken Quinoa and Brocolli Casserole

1 comment:
I made this for dinner on Monday night and 3 out of 4 of us REALLY liked this-I TOTALLY recommend adding the optional bacon! ;)
  • photo and recipe credit a Pinch of Yum
  • 2 cups reduced sodium chicken broth
  • 1 cup milk (I used 2%)
  • 1 teaspoon poultry seasoning
  • 1/2 cup flour
  • 2 cups water, divided
  • 1 cup uncooked quinoa, rinsed
  • 1/4 cup cooked, crumbled bacon (optional… sort of)
  • 1 pound boneless skinless chicken breasts
  • 2 teaspoons seasoning (like Emeril’s Essence or any basic blend you like)
  • 1/4 cup shredded Gruyere cheese (any kind will work)
  • 3 cups fresh broccoli florets

INSTRUCTIONS

  1. Sauce: Preheat the oven to 400 degrees and generously grease a 9×13 baking dish (seriously, be generous because it really really sticks to the sides). Bring the chicken broth and 1/2 cup milk to a low boil in a saucepan. Whisk the other 1/2 cup milk with the poultry seasoning and flour; add the mixture to the boiling liquid and whisk until a smooth creamy sauce forms.
  2. Assembly: In a large bowl, mix the sauce from step one, one cup water, quinoa, and bacon and stir to combine. Pour the mixture into the prepared baking dish. Slice the chicken breasts into thin strips and lay the chicken breasts strips over the top of the quinoa mixture. Sprinkle with the seasoning. Bake uncovered for 30 minutes.
  3. Broccoli: While the casserole is in the oven, place the broccoli in boiling water for 1 minute until it turns bright green and then run under cold water. Set aside.
  4. Bake: Remove the casserole from the oven, check the mixture by stirring it around in the pan, and if needed, bake for an additional 10-15 minutes to get the right consistency. When the quinoa and chicken are cooked and the sauce is thickened, add the broccoli and a little bit of water (up to one cup) until the consistency is creamy and smooth and you can stir it up easily in the pan. Top with the cheese and bake for 5 minutes, or just long enough to melt the cheese.

Tuesday, March 20, 2018

Happy birthday with Jillibean Soup

1 comment:
I created a birthday card the other day using the Bohemian Brew Collection by Jillibean Soup!  I even created my own little flower with paper, a sequin and a pop dot-I'm pretty happy with how it turned out:

I have plan for this card already-for someone who loves this sort of design and who's birthday is in June- ;)
Thanks for popping in!  Today is a busy one, class, dentist and a track meet to officiate at! 

Friday, March 16, 2018

Project Life!

1 comment:
So I am officially caught up with the last 6 months of 2017!!!  yes, my project life is a work in progress, what you are seeing now is the beginning of this year.  
 I have to tell you most of my pictures are taken with my iphone and I am using different editing software to write right on the pictures.  My favorites right now are WordSwag and Project Life which helps me to format my pictures to 3 x 4 size on a 4x6-then I can send them out and get them printed.  I've also noticed that I really LOVE to have my own journaling cards.  My FAVORITE artist/designer;  right now is Geralyn and can be found at In a Creative Bubble.  I follow her on Instagram on her personal and business accounts found HERE and HERE.  She is guest designing this month for The Digital Press and her designs are 30% off THIS weekend!  I've already purchased my favorites an thought I would share them with you.  I LOVE digital stamps because you can use them on your pictures or create your own journalling and embellishment cards! 

This is a real QUICK post as I have the house to myself and I want to enjoy some uninterrupted crafting time! ;) . Happy Friday to ya!!


Tuesday, March 6, 2018

Well, HELLO March!

No comments:
Life is FLYING by at a rapid pace and I'm trying to live life with my kiddos and enjoy the ride!


I wanted to share with you that Scrapbook Circle now has a class and kit which can be found HERE.  When I say class I mean several design team members have taken the kit and created different items and there are instructional videos to go with them!  Such an INCREDIBLE idea and deal for $35!!  I have a tutorial there as well!  We would LOVE to have you join us with the Only You class + kit!